I just found this website called Slideshare which has jewelry tutorials on it to share.
This tutorial is for a wire wrapped stud earrings with crystal beads. It is called the "Spring Butterfly Pendant Tutorial," and it is by Kasia of Kica Bijoux for House of Gems.

Showing posts with label free jewelry tutorial. Show all posts
Showing posts with label free jewelry tutorial. Show all posts
Thursday, July 24, 2014
Wednesday, May 28, 2014
Wire Wrap Stud Earrings Tutorial
I have another tutorial found on the website Slideshare for House of Gems.
This tutorial is for wire wrapped stud earrings. Very pretty. The tutorial is called "Mulberry Post Earring Tutorial," and it is by Colette Kimon.
This tutorial is for wire wrapped stud earrings. Very pretty. The tutorial is called "Mulberry Post Earring Tutorial," and it is by Colette Kimon.
Tuesday, April 22, 2014
Wire Woven Side Drilled Pendant Tutorial
I found this wire wrapped tutorial on The Beading Gem's Journal. It is for a beautiful woven wire pendant called the "Arcadian Legends Pendant," and the tutorial is by Colette Simon. Colette uses copper wire, and it looks beautiful in that, but I bet silver wire would look lovely too. You could probably use different sizes and shapes of beads to personalize the design. The possibilities are endless.
The slides for this tutorial make it a fairly easy project for all levels of wire wrappers.
The slides for this tutorial make it a fairly easy project for all levels of wire wrappers.
Tuesday, March 25, 2014
FREE Simple Wire Wrapped Heart Ring Tutorial
I love rings, and I love wire wrapped jewelry. So when I saw this tutorial, I was very excited. I think this ring is beautiful. And the designer of the ring, Copar Aingeal, says it is easy to make. That is always a plus.
I first saw this ring while scanning Facebook. It was offered on the business page for Jewelry Making Club. Jewelry Making Club has a pretty interesting page for beaders, and quite often, they have free jewelry making patterns.

Copar, the designer, says this about the ring: "This is a very simple and sweet wire wrapped heart ring. It makes up very quickly and can be as fancy as you want it to be. Try using 2-3mm gemstone beads. Or keep it simple and have fun with colored craft wire and seed beads."
She also goes on to say the ring can be sized to fit. The beaded heart on top is about 1/2-3/4", just depending on how big you want it to be.
Your materials list is fairly simple:
I first saw this ring while scanning Facebook. It was offered on the business page for Jewelry Making Club. Jewelry Making Club has a pretty interesting page for beaders, and quite often, they have free jewelry making patterns.
Copar, the designer, says this about the ring: "This is a very simple and sweet wire wrapped heart ring. It makes up very quickly and can be as fancy as you want it to be. Try using 2-3mm gemstone beads. Or keep it simple and have fun with colored craft wire and seed beads."
She also goes on to say the ring can be sized to fit. The beaded heart on top is about 1/2-3/4", just depending on how big you want it to be.
Your materials list is fairly simple:
- 8 inches of 20 guage wire for the frame
- 3.5 feet of 24 guage wire for the wrapping
- and 16-20 2mm seed or gemstone beads
Your tools list:
- wire cutters
- needle nose pliers
- chain nose pliers
- ruler
- ring mandrel for sizing
- optional tool - flat nylon jaw
Thursday, August 15, 2013
Wire Wrapped and Beaded Pendant
I love wire wrap jewelry. And I also like sharing FREE TUTORIALS when I find a good one online.
This tutorial is by the jewelry artisan, Dev Khan, from Santa Rosa CA.
Dev cuts and polishes her own stones, as well as beautifully wraps them.
I found this tutorial on the website Make Craft. Here is the link for Dev's tutorial for wrapping a beautiful pendant like the example below.
Dev cuts and polishes her own stones, as well as beautifully wraps them.
I found this tutorial on the website Make Craft. Here is the link for Dev's tutorial for wrapping a beautiful pendant like the example below.
 |
| Photo by Sara K. Woll |
Friday, September 14, 2012
FREE Tutorial Rolo Chain and Leather Bracelet
This is a bracelet tutorial I really like. I am thinking my husband may need a bracelet like this. All the supplies are available at Primitive Earth Beads Chains and Leather. I have links on the bottom of this tutorial (they may or may not work-sorry.) And the You Video intstructions are further down on the page. Hope you enjoy.
 |
| Photo credit: From The Beading Gem's Journal |
|
The materials needed to make this style of bracelet are: 2 feet of rollo chain 2 yards of leather (the size of the leather will be determined by the size of the Rollo chain) Cut the chain into three equal lengths, generally 7 to 7.5 inches long depending on the desired bracelet size, (you will want an uneven number of links on each piece of chain). If you purchased more chain, you can make as many sections as you want. Lay the three lengths of chain parallel (I use a mandrel or heavy piece of wire so that I can see they are even and the same length.) Find the center of your leather cord. Weave one end of the leather through the first link of each section, until you reach the half way point. Now pick up one end of the leather and run it through the third link this link will be laying in the same direction as the first one. You will now have both pieces of leather on the same side of your bracelet. Turn the bracelet over. Now take the top piece of leather and run it through the same set of links as the bottom piece of leather. Continue in this manner until you reach the end. Keep the tension even as you weave the bracelet; make sure the links continue to lie parallel to each other. Now you are ready to run the leather cords through the first set of links, back to where you started. You will have three strands of leather going through this set of links. Be sure to allow enough length of your leather ends to take the bracelet on and off. You can add beads to the ends or tie an overhand knot to keep the leather ends from pulling out as you take the bracelet on and off. Enjoy your bracelet and the many compliments you will receive!! Here are the items needed to make the rolo chain bracelet:
| |||
| Links to the categories of the items listed above: | |||
 CH-50 (7.0MM) |  rubber tubing |  Greek leather |  large hole bead |
Tuesday, August 28, 2012
FREE Tutorial Tuesday - Button Necklace
I found this FREE necklace tutorial on the blog, "Lilly Pilly," by Jo in Tas. It was a post from 2009. I love it. I think it is creative and fun and colorful. I really like her color choices but that can always be changed to whatever are your favorites. I may have to make one myself soon.


Thursday, August 16, 2012
Fun FREE Bracelet Tutorial

Now these are some bracelets I really like. I can see them done in fall colors, as well as these pretty colors. I just love the combination of the macrame and metal.
This FREE bracelet tutorial comes from "Honestly...WTF." And it is called DIY Macrame Bracelet.
Monday, June 4, 2012
Chainmail Earrings Tutorial

To begin, Marilyn is describe the wire used and the jump rings. Here goes...
Wire
"First, the wire used to make the jump rings comes in different "tempers", from dead soft, through half-hard, to hard. I like to use half-hard wire because it gets harder as it is coiled and made into rings, and it gets harder still as the rings are tumbled to clean and polish them. My goal is to have rings that won't pull open."
Wire comes in different thicknesses—or diameter. The wire for this project measures 1.0 mm in diameter.
Chainmail Weaves
This Japanese 6 in 1 chainmail pattern has its roots in Japanese armour from the middle ages. The Japanese weaves look best with small rings for the vertical connector rings and large rings for the horizontal rings. Both rings can be doubled up, as in this project, for a tight, stable weave.
| Step 1 Close one large ring and open 5 large rings. Open 4 small rings. Insert a large ring through the closed large ring and close it. Slide the 2 rings together so the top of ring #2 lies behind ring #1. Keep holding... |  |
| Step 2 Put ring #3 through the centre of the first 2 rings, close it, & slide it sideways so the top of ring #3 lies behind ring #2. If you MUST set the cluster down, do it carefully so the order of the rings stays the same. I have been known to drop it on the floor, and I've found that it's faster to start the cluster over from scratch than try to put the rings back in the right order. |  |
| Step 3 Put ring #4 through the centre of the first 3 rings, close it, and slide it sideways so the top of ring #4 lies behind ring #3. |  |
| Step 4 Follow this pattern to add rings #5 and 6. This completes one mobius ball or flower. |  |
|

Now it's time to join the two segments to the earring findings.
Carefully open the loop on an earring finding. (Remember to use 2 pairs of pliers and open it the same way you would open a jump ring.) Slide the open loop around the two top rings and then gently close it.
Finish the second earring the same way.

by Marilyn Gardiner www.MarilynGardiner.com Hope you enjoy! | |
Saturday, April 21, 2012
How to Make Wrapped Leather Bracelets
This tutorial is from the blog Rings & Things. I just love the contemporary feel to the bracelet. And it could be made for a man or a woman. I, personally, have seen these bracelets on different shopping sites retailing for $120. to $150. But with these instructions, you can make them for a whole lot less. Make one for yourself, or two, or three. Or make them as a gift. That is what I am planning to do. I have a friend's birthday coming up and I all ready have the beads and thread and cord picked out. I can't wait to give it a go.
How to make wrapped leather bracelets

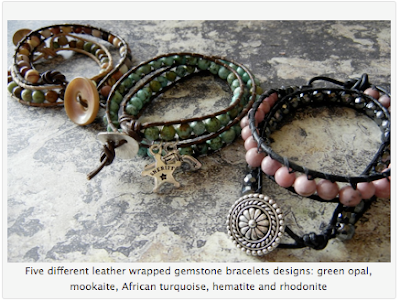
How to make wrapped leather bracelets


Sunday, April 15, 2012
Wire and Bead Tutorial
This is a new bracelet tutorial from Judy Larson and found on Beading Gem's website.
Braided Wire and Bead Bangle Tutorial
Braided Wire and Bead Bangle Tutorial
Subscribe to:
Posts (Atom)